What it will look like
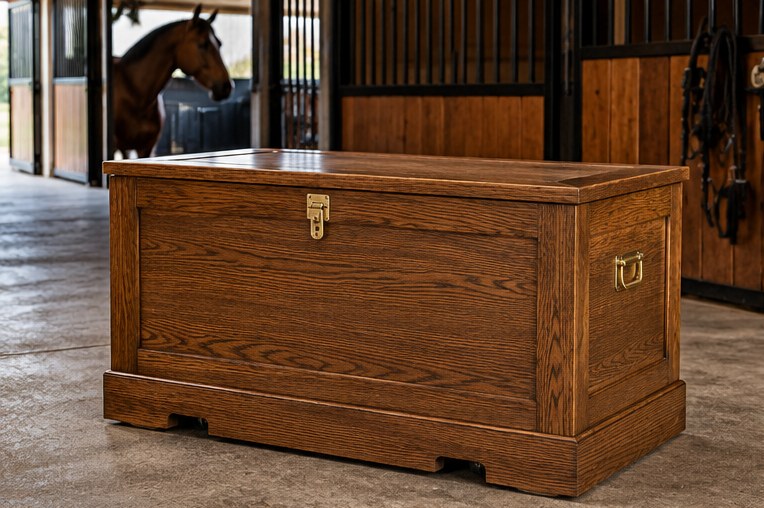
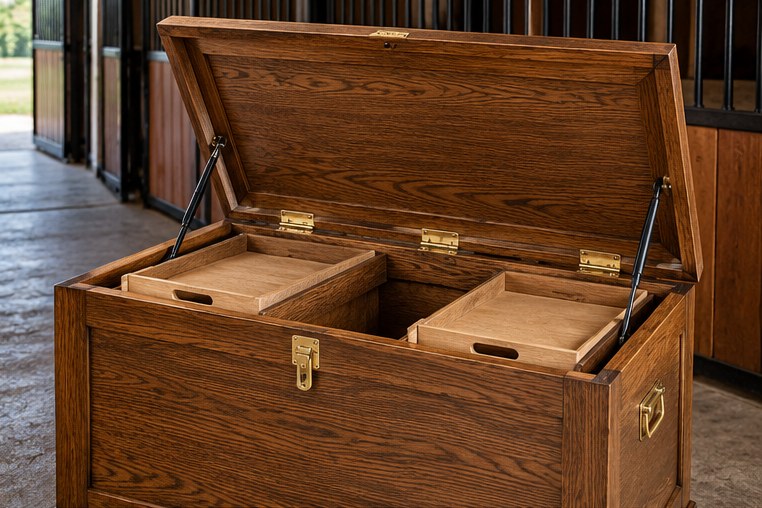
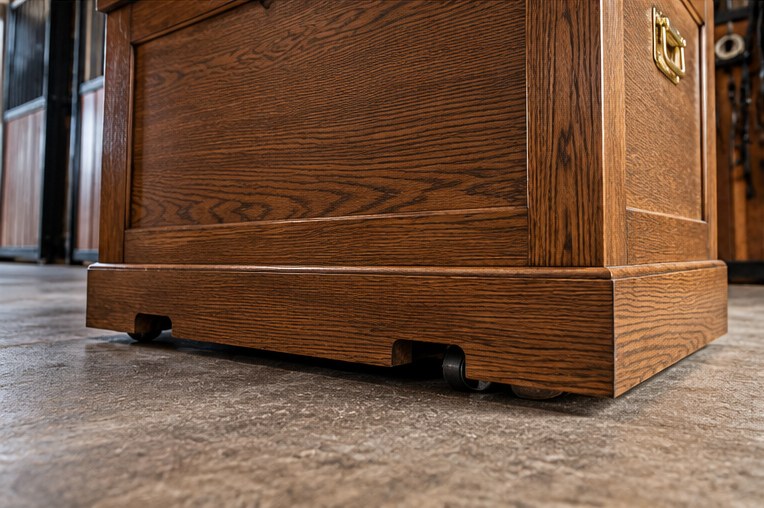
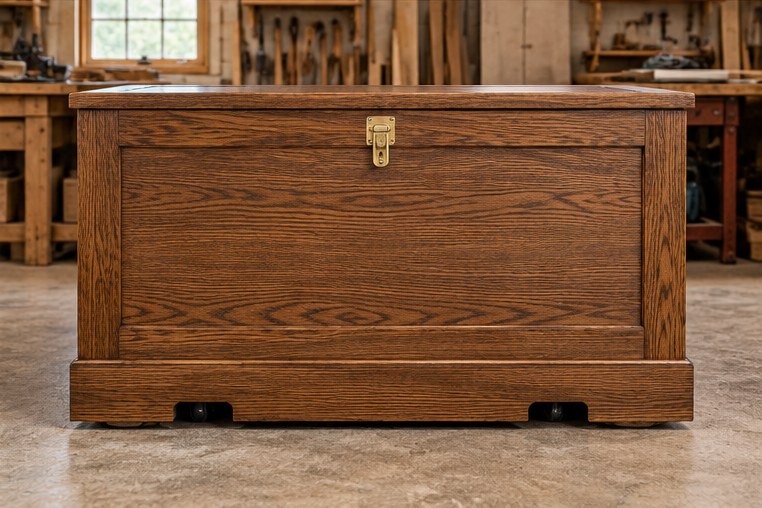
Concept renderings in stained red oak with brass hardware. Illustrations only; proportions and details may differ slightly from the cut list.
Overview
Finished size: 44.5" L × 24" D × 26.5" H. Interior: 40.5" × 20.5" × 20.75" deep, about 10 cu ft. Red oak plywood panels in a solid red oak frame, on hidden locking casters, with two trays (one per rider). Not built to hold a saddle.
| Part | Design |
|---|---|
| Panels | 3/4" red oak plywood (veneer core) for walls, floor and lid core |
| Trim | 3/4" solid red oak corner stiles, top and bottom rails, and a mitered top cap; every plywood edge is covered |
| Body | 42" × 22" × 20" plywood shell; ends fit between front and back, glued and screwed (screws hidden under trim) |
| Floor | Solid 3/4" red oak plywood panel under the walls, sealed both sides |
| Base | 4.5" solid red oak plinth hiding the casters; plinth clears the floor by ~1/2" |
| Casters | 3" polyurethane: 2 swivel with total-lock brakes (front), 2 rigid (back) |
| Lid | 44.5" × 24": plywood core in a 2" mitered solid red oak frame; flush at back, 1/2" overhang front and ends |
| Hinges | 4 solid brass 3" butt hinges, mortised into solid red oak (cap and lid frame) |
| Lid support | 2 gas struts |
| Other brass | 2 end handles (through-bolted), hasp, 2 nameplates |
| Interior | Two trays (14" × 20") slide on ledgers |
Why this build: plywood panels don't expand, shrink or split with barn humidity the way wide solid boards can. Solid red oak trim protects the plywood edges from dents. Poplar is out because it stains blotchy and can turn greenish-brown.
Cut list
Final sizes, 3/4" thick unless noted. Miters are measured long point to long point. Cut the trim after the shell is built: measure, then cut to fit.
| # | Part | Qty | Size (L × W) | Material |
|---|---|---|---|---|
| P1 | Front / back panels | 2 | 42" × 20" | 3/4" red oak ply |
| P2 | End panels | 2 | 20.5" × 20" | 3/4" red oak ply |
| P3 | Floor | 1 | 42" × 22" | 3/4" red oak ply |
| P4 | Lid core | 1 | 40.5" × 20" | 3/4" red oak ply |
| P5 | Caster blocks | 4 | 5" × 5" | 3/4" ply offcut |
| P6 | Gas strut blocks | 2 | 6" × 3.5" | 3/4" ply offcut |
| P7 | Tray bottoms | 2 | 14" × 20" | 1/4" ply |
| S1 | Corner stiles, front / back | 4 | 20" × 2.75" | Solid red oak |
| S2 | Corner stiles, ends | 4 | 20" × 2" | Solid red oak |
| S3 | Top rails, front / back | 2 | 38" × 2.5" | Solid red oak |
| S4 | Top rails, ends | 2 | 18" × 2.5" | Solid red oak |
| S5 | Bottom rails, front / back | 2 | 38" × 3" | Solid red oak |
| S6 | Bottom rails, ends | 2 | 18" × 3" | Solid red oak |
| S7 | Top cap, front / back (mitered) | 2 | 43.5" × 1.5" | Solid red oak |
| S8 | Top cap, ends (mitered) | 2 | 23.5" × 1.5" | Solid red oak |
| S9 | Plinth, front / back | 2 | 43.5" × 4.5" | Solid red oak |
| S10 | Plinth, ends | 2 | 22" × 4.5" | Solid red oak |
| S11 | Center rail (under floor) | 1 | 22" × 3.5" | Solid red oak |
| S12 | Lid frame, long (mitered) | 2 | 44.5" × 2" | Solid red oak |
| S13 | Lid frame, short (mitered) | 2 | 24" × 2" | Solid red oak |
| S14 | Tray ledgers | 2 | 38.5" × 1.5" | Solid red oak |
| S15 | Ledger stops | 4 | 1.5" × 1.5" | Solid red oak |
| S16 | Tray sides | 4 | 14" × 3.5" | Solid red oak |
| S17 | Tray ends | 4 | 18.5" × 3.5" | Solid red oak |
The front/back stiles (S1) are 2.75" wide so they cover the edge of the end stiles (S2); both faces show 2.75" at each corner. The ledgers stop 1" short of each end wall, and the stops keep the trays 2.5" clear of the gas struts. That leaves a 7.5" gap between the trays for reaching the bottom.
Shopping list
This is everything needed, from raw material to finished trunk. Buy the casters and gas struts before cutting the plinth and strut blocks, because their sizes set those dimensions. See Estimated cost below; red oak lumber and plywood prices vary by region.
Sheet goods (lumber yard; some big-box stores also stock red oak plywood)
2 — 3/4" × 4' × 8' red oak plywood, A-1 or A-2 face grade, veneer core (not MDF or particleboard core). Sheet 1: rip two 20" strips for P1 × 2 and P2 × 2. Sheet 2: rip a 22" strip for P3 and P4. Cut P5 and P6 from the offcuts.
1 — 1/4" × 2' × 4' red oak or birch plywood (P7 tray bottoms)
Solid red oak lumber (4/4, surfaced four sides to 3/4")
5 — 1x6 × 8' (5.5" wide): plinth S9/S10 (2), top rails S3/S4 + end stiles S2 (1), lid frame S12/S13 + ledgers S14/S15 (1), spare (1)
7 — 1x4 × 8' (3.5" wide): bottom rails S5/S6 (2), front/back stiles S1 (1), top cap S7/S8 (1), tray sides/ends S16/S17 (2), center rail S11 + spare (1)
If the yard sells random widths by the board foot: ~30 bd ft of 4/4 S4S red oak (about 19 bd ft net plus waste for ripping and defects)
Hardware
4 — solid brass butt hinges, 3" × 2.5" open, with solid brass screws no longer than 5/8"
2 — gas struts with mounting brackets, about 10" (250 mm) extended, roughly 60–100 N each. Confirm the force with the seller's lid calculator using a lid weight of about 20 lb and your mounting points.
2 — 3" swivel plate casters with total-lock brakes, polyurethane or TPR non-marking wheels, rated 125 lb or more each, overall height 3.25"–4"
2 — 3" rigid plate casters, same wheel, rating and height
2 — solid brass chest handles, end-mount
1 — solid brass hasp, 3"–4", plus a brass or stainless padlock
2 — brass nameplates, one per rider (optional)
Fasteners and glue
50 — #8 × 1-5/8" exterior-coated or stainless wood screws: shell corners (16), floor to walls (~22), plinth (~12)
40 — #8 × 1-1/4" exterior-coated or stainless wood screws: caster blocks (16), center rail (4), ledgers (~10), strut blocks (4)
16 — 1/4" × 1-1/4" hex lag screws + flat washers (casters; match the caster plate's hole size)
4–8 — 10-24 × 1" brass machine screws with washers and acorn nuts (handles; count depends on the handle's holes)
1 box — 1-1/4" 18-gauge brad nails (trim, trays)
1 box — 3/4" 18-gauge brad nails (tray bottoms)
~20 — #20 biscuits (lid frame; optional)
~15 — 3/8" red oak face-grain plugs for plinth screw holes, or cut your own with a plug cutter
1 qt — Titebond III waterproof wood glue
Finishing supplies (see Finishing)
Sandpaper: 120, 150, 180, 220 and 320 (discs and sheets)
Pre-stain wood conditioner, 1 qt (for testing; often not needed on red oak)
Oil-based stain, medium to dark, 1 qt
Oil-based exterior spar urethane or marine spar varnish, 1 gal
Penetrating epoxy sealer, small kit (bottom edges and floor underside; optional but recommended)
Mineral spirits, tack cloths, lint-free rags, natural-bristle or foam brushes, nitrile gloves
Tools
Table saw (ripping the oak, cutting plywood strips); a track saw or circular saw with a guide works for the sheets
Miter saw (trim and cap miters)
Router with 1/4" roundover and flush-trim bits
Biscuit joiner (optional)
18-gauge brad nailer
Drill/driver, countersink bit, 3/8" counterbore bit, 3/8" plug cutter
Clamps: 4 × 48"+ bar clamps, 6 × 24" clamps, 1 band clamp for the mitered frames
Chisels (3/4", 1/4"), marking knife, square, tape, random orbit sander, flush-cut saw
Estimated cost
About $855–$1,295 in materials ($920–$1,445 on the Beginner route), plus freight if the plywood ships. Tools are not included. The two lumber lines come from retailer listings checked today; the other lines are typical-price estimates, not quotes.
| Item | Est. cost | Basis |
|---|---|---|
| 3/4" red oak plywood, 2 sheets | ~$236 | $118/sheet, A-1, 7-ply veneer core (Baird Brothers) |
| 4/4 red oak, ~30 bd ft | ~$180 | $5.99/bd ft, Select & Better, S2S at 13/16"; still needs ripping and planing to 3/4" (Woodworkers Source) |
| 1/4" plywood, 2' × 4' | $20–40 | estimate |
| Solid brass hinges (4) | $60–160 | estimate |
| Gas struts (pair) | $20–60 | estimate |
| Casters (4) | $40–100 | estimate |
| Brass handles, hasp, padlock | $50–130 | estimate |
| Nameplates (2, optional) | $0–60 | estimate |
| Screws, lags, bolts, brads, biscuits, plugs, glue | $60–90 | estimate |
| Stain, conditioner, spar varnish, epoxy, sandpaper, brushes | $185–235 | estimate |
What moves the number: a local Connecticut hardwood dealer may beat the online prices and saves freight. Buying fully surfaced (S4S) red oak costs more per board foot. On the Beginner route, S4S red oak at 3/4" typically runs $7–9/bd ft (estimate, about $210–270 for 30 bd ft), plus roughly $20–60 in dealer cutting and ripping fees (estimate). Any tools you don't own (brad nailer, biscuit joiner, band clamp, bar clamps) add to it.
Lumber yard call script
Use this when calling yards. Benchmarks from online retailers: about $118/sheet for the plywood and about $6/bd ft for the oak, before surfacing and ripping fees.
1. Do you carry:
3/4" red oak plywood, 4' × 8', veneer core (not MDF), A-1 or A-2 grade? Need 2 sheets.
1/4" red oak or birch plywood, 2' × 4'? Need 1.
4/4 red oak, surfaced four sides to 3/4", Select & Better or #1 Common? Need about 30 bd ft plus 20% for defects.
2. Will you cut:
Plywood to size: front/back 2 @ 42" × 20", ends 2 @ 20.5" × 20", floor 1 @ 42" × 22", lid core 1 @ 40.5" × 20". Keep the offcuts.
Oak ripped to these widths. Lengths are totals summed across pieces, not single boards. The longest single piece is 44.5", so any board 6 ft or longer works:
| Width | Total length | Longest piece | Parts |
|---|---|---|---|
| 4.5" | 131" | 43.5" | S9, S10 (plinth) |
| 3.5" | 152" | 22" | S11, S16, S17 (center rail, trays) |
| 3" | 112" | 38" | S5, S6 (bottom rails) |
| 2.75" | 80" | 20" | S1 (front/back stiles) |
| 2.5" | 112" | 38" | S3, S4 (top rails) |
| 2" | 217" | 44.5" | S2, S12, S13 (end stiles, lid frame) |
| 1.5" | 217" | 43.5" | S7, S8, S14, S15 (cap, ledgers, stops) |
I'll cut to length and miter myself.
3. Logistics: price per sheet and per bd ft, cutting fee, lead time, delivery to Roxbury or pickup (will cut pieces fit an SUV?), and whether you can pick boards for even color. Red oak ranges from pink to tan.
4. Red flags: MDF or particleboard core (decline); rough or S2S only (ask if they'll surface it); won't rip (try the next yard, or buy standard 1x widths at a big-box store and rip only the 4.5", 3", 2.75" and 2" pieces yourself).
Board lengths
Hardwood dealers sell random lengths, usually 6–12 ft. Home Depot and Lowe's sell 4, 6 and 8 ft. Example layout of the two longest totals on 8 ft (96") strips:
| Width | Strip 1 | Strip 2 | Strip 3 |
|---|---|---|---|
| 2" | 44.5 + 44.5 = 89" | 24 + 24 + 20 + 20 = 88" | 20 + 20 = 40" |
| 1.5" | 43.5 + 43.5 = 87" | 23.5 + 23.5 + 38.5 = 85.5" | 38.5 + 4 × 1.5 = 44.5" |
Cut each piece about 1/16" long to allow for the saw blade and trimming.
Drawings
Part codes match the cut list. Panels, trim and trays are drawn to scale; hardware positions are approximate.
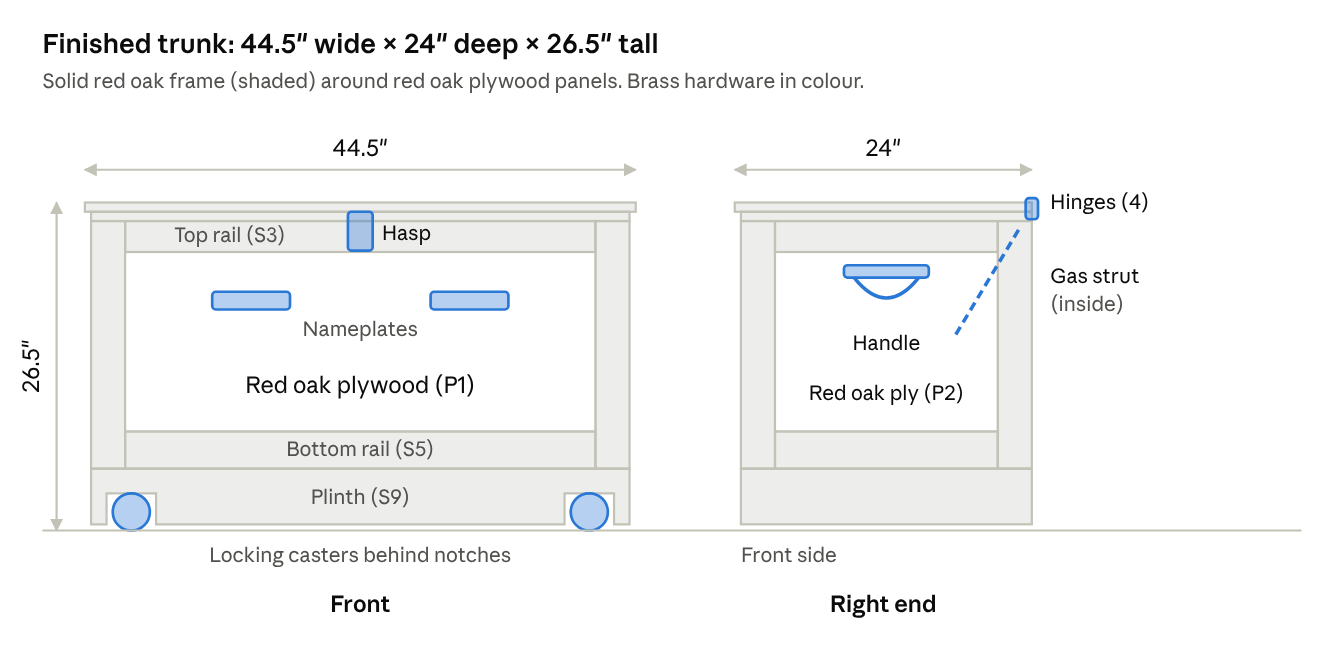
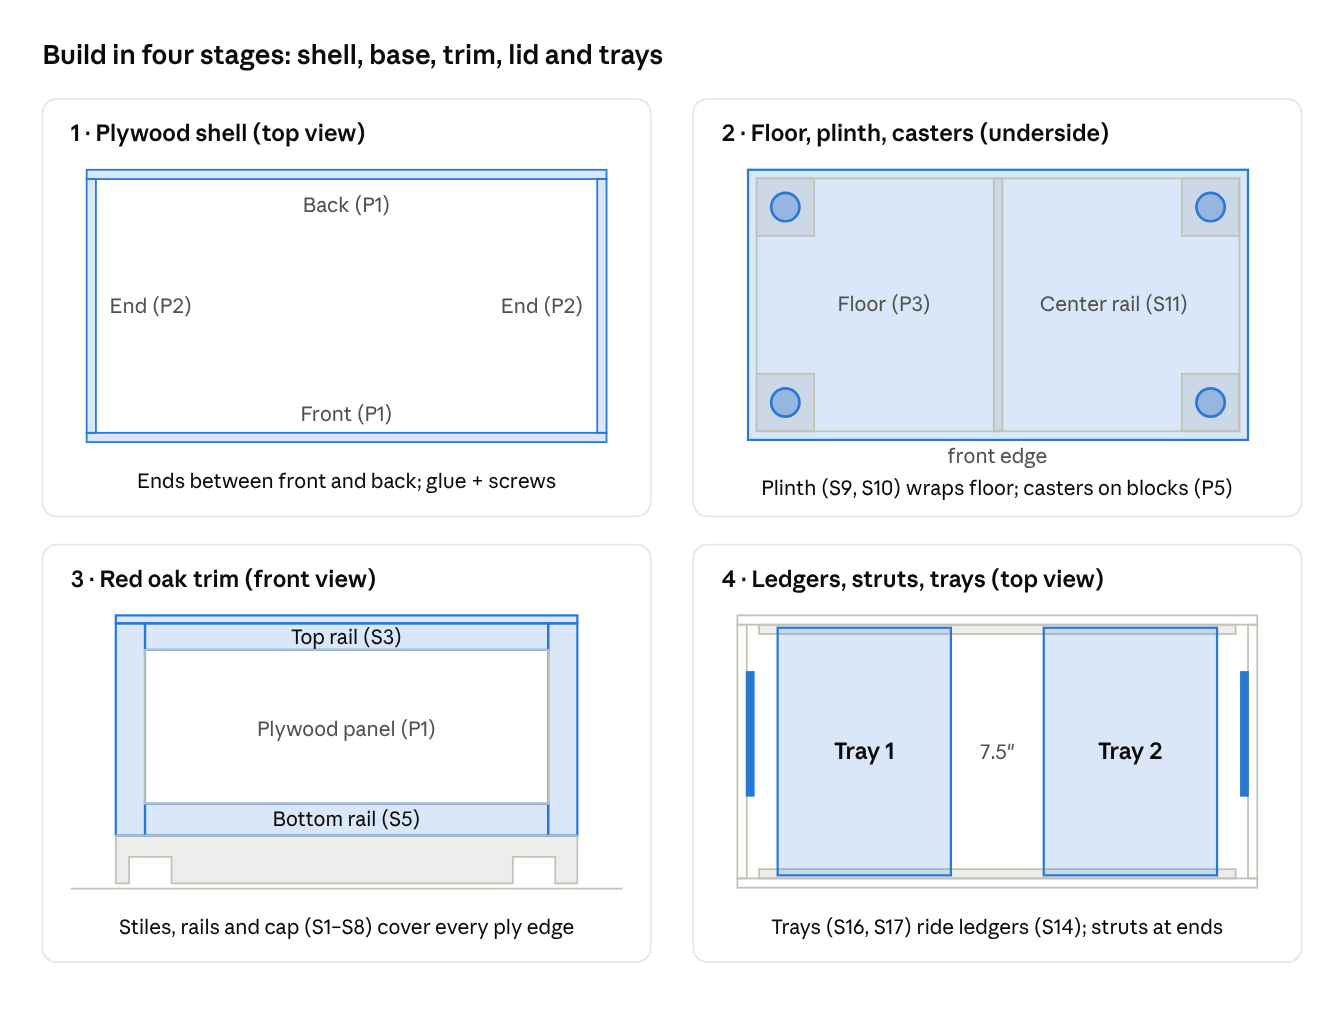
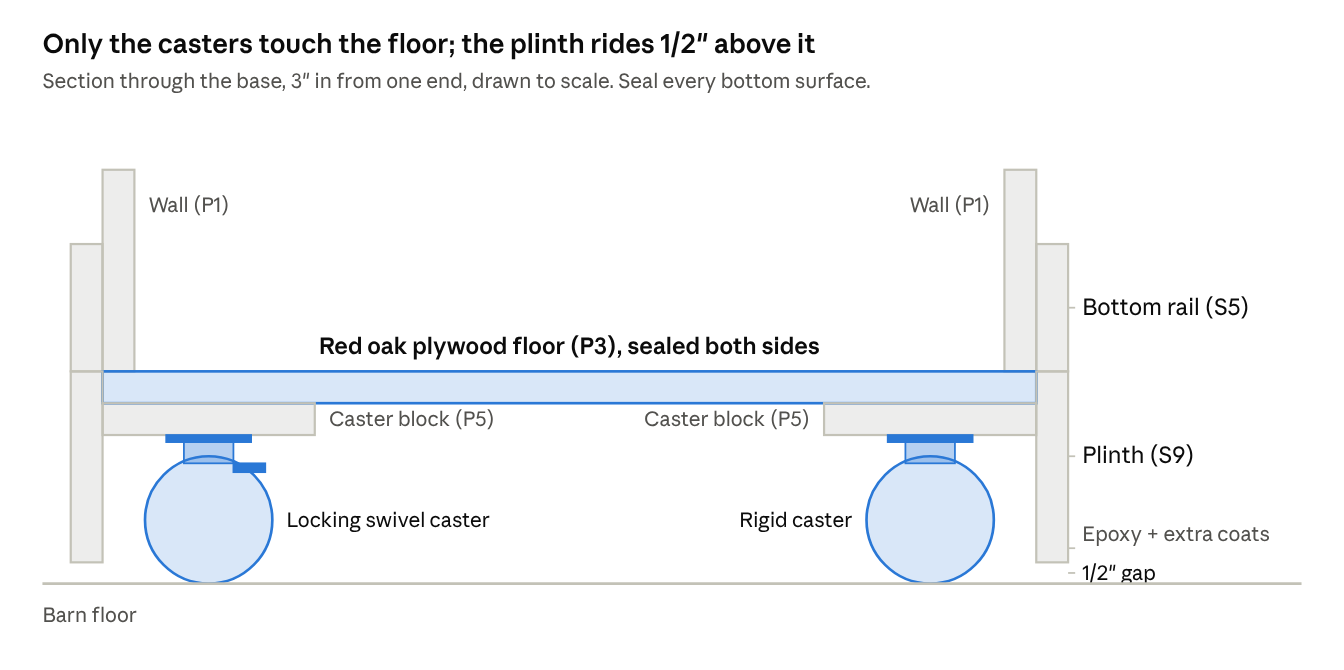
Only the four casters touch the floor. Every plywood edge is covered by solid red oak, and every bottom surface is sealed.
Beginner route
Same trunk, with the skill-heavy steps removed or handed to the lumber dealer: no planing, almost no table saw, no hinge mortises. Expect roughly 25–40 hours of shop time; that figure is an estimate.
| Change | Replaces | Trade-off |
|---|---|---|
| Order the red oak S4S at 3/4" and have the dealer rip it to the widths below | Planing and ripping the oak yourself | Costs more per board foot; no planer, and the table saw is optional |
| Have the dealer cut the plywood to P1–P4 sizes | Breaking down 4×8 sheets | Small cutting fee; square, accurate panels |
| One solid brass piano hinge, 42" long, screwed on the surface | 4 mortised butt hinges | No chisel work and easier to align; looks less traditional |
| Keep the mitered cap and lid frame, glued with a band clamp; biscuits optional | — | Mitered corners stay; no end grain showing |
| Cut the plinth notches with a jigsaw | Table saw or router | Sand the cut edges smooth afterwards |
Getting clean miters as a beginner:
Check the saw first. Cut two test miters from scrap and put them together. If the joint doesn't close at a true 90°, adjust the saw's 45° stop before cutting real parts.
Cut long first. Cut each piece about 1/16" long, dry-fit the frame, then trim to a tight fit.
Clamp all four corners at once with a band clamp, and check the diagonals before the glue sets.
Fixing small gaps: rub the joint with the side of a screwdriver shank to close them before finish. Wood filler shows through stain.
Optional strength: one biscuit or a spline per corner, or just glue; the plywood core carries most of the load.
Dealer rip list (ask for about 20% extra for defects)
| Width | Total length | Parts |
|---|---|---|
| 4.5" | 131" | S9, S10 (plinth) |
| 3.5" (standard 1x4, no rip) | 152" | S11, S16, S17 (center rail, trays) |
| 3" | 112" | S5, S6 (bottom rails) |
| 2.75" | 80" | S1 (front/back stiles) |
| 2.5" | 112" | S3, S4 (top rails) |
| 2" | 217" | S2, S12, S13 (end stiles, lid frame) |
| 1.5" | 217" | S7, S8, S14, S15 (cap, ledgers, stops) |
The lengths match the mitered cut list. Crosscut and miter every piece yourself on a miter saw, cutting test pieces first.
Tools on this route
Still needed: miter saw, drill/driver with a countersink bit, random orbit sander, 18-gauge brad nailer, jigsaw, bar clamps, 3/8" plug cutter.
Optional: a router for the 1/4" roundover (sanding the edges round also works) and a flush-trim bit.
No longer needed: planer, table saw, biscuit joiner, band clamp, chisels.
Practice first
On offcuts, practice three things before touching the real parts: stain and topcoat test boards, one mitered frame corner, and one set of screws into a plywood edge (pilot hole, no splitting).
Build steps
Plan on 3–4 weekends, mostly waiting for glue, stain and finish to dry. Part codes match the cut list.
Buy casters and struts first. Measure the caster's overall height (top of plate to bottom of wheel). Floor clearance = caster height − 3". A 3.5" caster gives 1/2". If the caster is under 3.25", add a 1/4" plywood shim under each caster block.
Acclimate and break down. Keep the lumber and plywood in the shop for a week. Cut the plywood per the sheet layout, then rip the oak to width.
Build the shell. Set the ends (P2) between the front and back (P1). Glue, drill pilot holes and drive 4 × 1-5/8" screws per corner, heads flush; the stiles will cover them. Check that the diagonals are equal.
Add the floor. Glue the floor (P3) to the bottom edges of the walls and screw up through it every 6".
Build the base. In the front plinth (S9), cut two 4" wide × 2.5" tall notches in the bottom edge, centered 3.25" from each end, so you can reach the caster brakes. Glue and screw the plinth (S9, S10) around the floor's edges, top flush with the floor's top face. Counterbore the screws and plug them. Glue and screw the caster blocks (P5) into the four corners under the floor, and the center rail (S11) across the middle.
Apply the trim. Glue and brad the front/back stiles (S1) so they overlap the end stiles (S2). Add the top rails (S3, S4) flush with the top of the plywood and the bottom rails (S5, S6) resting on the plinth. Flush-trim any overhang.
Cap the rim. Miter S7 and S8, then glue and brad them onto the wall tops so they cover both the plywood edge and the trim edge.
Fit out the interior. Center the ledgers (S14) on the front and back walls with their top edge 4" below the top of the cap. Add the stops (S15) at each ledger end. Glue the strut blocks (P6) to the end walls where the strut brackets will land.
Make the lid. Miter S12 and S13, then biscuit and glue the frame around the lid core (P4) using a band clamp. Round over the edges with the 1/4" bit.
Build the trays. Glue and brad the S16/S17 frames, then glue and brad on the 1/4" bottoms (P7).
Finish. Remove all hardware first. See Finishing below.
Install the hardware. Casters go on the corner blocks with the two locking swivels at the front. Seal each lag hole with a drop of finish before driving the screw. Mortise the hinges into the back cap and lid frame, 4" from each end with the middle two about 11.8" apart. Mount the gas struts and test that the lid holds open and doesn't slam or fling open. Through-bolt the handles centered on each end, about 3" below the cap. Center the hasp on the front.
Finishing
Red oak has open pores, so it takes stain well and shows strong grain. Test every step on offcuts of both the plywood and the solid red oak before touching the trunk. Plywood veneer and solid boards can still take stain slightly differently, even in the same species, so test both.
Sand. Take the solid red oak to 180 grit and the plywood to 150–180 with light passes. Hardwood plywood veneer is often under 1/32" thick, and a sand-through can't be repaired. Vacuum, then wipe with a tack cloth.
Conditioner: test first. Pre-stain conditioner evens out color on blotch-prone woods. Red oak usually stains evenly without it, and conditioner can make the pores come out lighter. Stain one test board with conditioner and one without. Use it only if the plywood blotches, and use it on every surface if you do, so the veneer and the trim still match.
Stain. Wipe on a medium-to-dark oil-based stain, leave it for the time the can specifies, and wipe off along the grain. Stain the trim and the panels in the same session so the color matches. Let it dry fully before the topcoat, usually 24–72 hours and longer in a cold or humid shop.
Topcoat. Brush on at least 3 coats of oil-based exterior spar urethane or marine spar varnish outside and 2 inside. Scuff-sand with 320 between coats. Staying oil-over-oil avoids adhesion problems. Put a water-based topcoat over oil stain only if the stain maker approves it.
Cure before use. Finish is dry to the touch within hours, but full cure typically takes 2–4 weeks. Wait at least a week before loading gear, and keep it away from washdowns until the can's full cure time has passed.
Bottom and floor contact
Clearance: only the four casters touch the floor. The plinth sits about 1/2" up, so washdown water and air can pass underneath.
Floor underside: seal the underside of the floor panel (P3) and the caster blocks. Stain there is optional; sealing is not. Do it after assembly so glue joints aren't coated.
Plinth bottom edges and corners: these take the most splash. Brush on 1–2 coats of penetrating epoxy sealer, then the same spar coats as everywhere else, plus 2 extra. Pay extra attention to the end grain at the plinth corners.
Caster holes: put a drop of finish in each lag hole before driving the screws, so water can't wick in around them.
Seal both faces of every plywood part: inside, outside, top and bottom. Unsealed plywood takes on moisture unevenly.
Washdowns: roll the trunk out before hosing the aisle, and don't let it sit in standing water. Casters make this a 10-second job.
Upkeep: wipe it down with a damp cloth. Scuff-sand and recoat worn spots, especially the plinth edges, every 1–2 years.
Barn notes and grey areas
Plywood glue. Most hardwood plywood is made with interior-rated (Type II) glue. It handles barn humidity when fully sealed, but it is not waterproof: standing water or repeated soaking can delaminate it. Marine-grade red oak plywood is uncommon.
Rot. Red oak is not naturally rot-resistant. Red oak's open pores also wick water in through cut ends and edges, so seal every plywood edge and all end grain fully. The finish is what protects it, so keep the finish intact.
Thin veneer. A-grade red oak veneer is thin. Deep scratches or heavy sanding go through to the core layers.
"Brass" vs solid brass. Much hardware sold as brass is brass-plated steel, which rusts in barn humidity and ammonia. Check that the listing says solid brass. Gas struts and casters will be steel; that's expected.
Solid brass tarnishes. It darkens to an antique finish unless lacquered or polished. It will not rust.
Gas struts in cold weather. Gas strut force drops as temperature falls. Struts sized in a warm shop may not hold the lid fully open in a Connecticut winter barn. Size toward the upper end of the calculator's range, or buy adjustable struts. Struts that are too strong will push the lid open hard.
Caster brakes. Only the two front casters lock; reach the pedals through the plinth notches. The rigid rear casters stop the trunk from rolling sideways.
Weight. The trunk will be roughly 115–140 lb empty (calculated from wood volume, not weighed; plywood cores vary). The handles are for steering or lifting one end, not for carrying it loaded.
Mice. The solid plywood floor has no gaps. Keep feed and treats out of the trunk.
Barn rules. Some barns limit trunk size or require them to be locked. Worth confirming before you build.